Creating Your First Basketball Arena
This comprehensive guide will walk you through setting up a MCBasketball basketball arena from start to finish. By the end, you'll have a fully functional game ready for players to enjoy!
🎯 Overview
Creating a MCBasketball arena involves:
- Basic Setup: Create the game and define play areas
- Team Configuration: Set goals and spawn points
- Game Activation: Enable and test your arena
- Optional Enhancements: Add advanced features
⚡ Quick Setup (Minimum Requirements)
Step 1: Create Your Game
First, create a new arena configuration file:
/mcbasketball create game1 My first game
Pro Tip
You can copy settings from an existing arena instead:
/mcbasketball copy existing_game new_game My new game
Step 2: Verify Creation
Check that your game was created successfully:
/mcbasketball list
Expected Output:
game1 [My first game] [disabled]
✅ Success! Your arena exists but is disabled (normal for new arenas).
Step 3: Get Setup Tools
Obtain the selection tool for marking areas:
/mcbasketball axe
Enable visual highlighting to see areas while editing:
/mcbasketball highlight game1
Visual Aid
Highlighting makes boundaries visible with particles/blocks, making setup much easier!
🏟️ Define Your Playing Areas
Step 4: Mark the Playing Field
The playing field is where all basketball action happens.
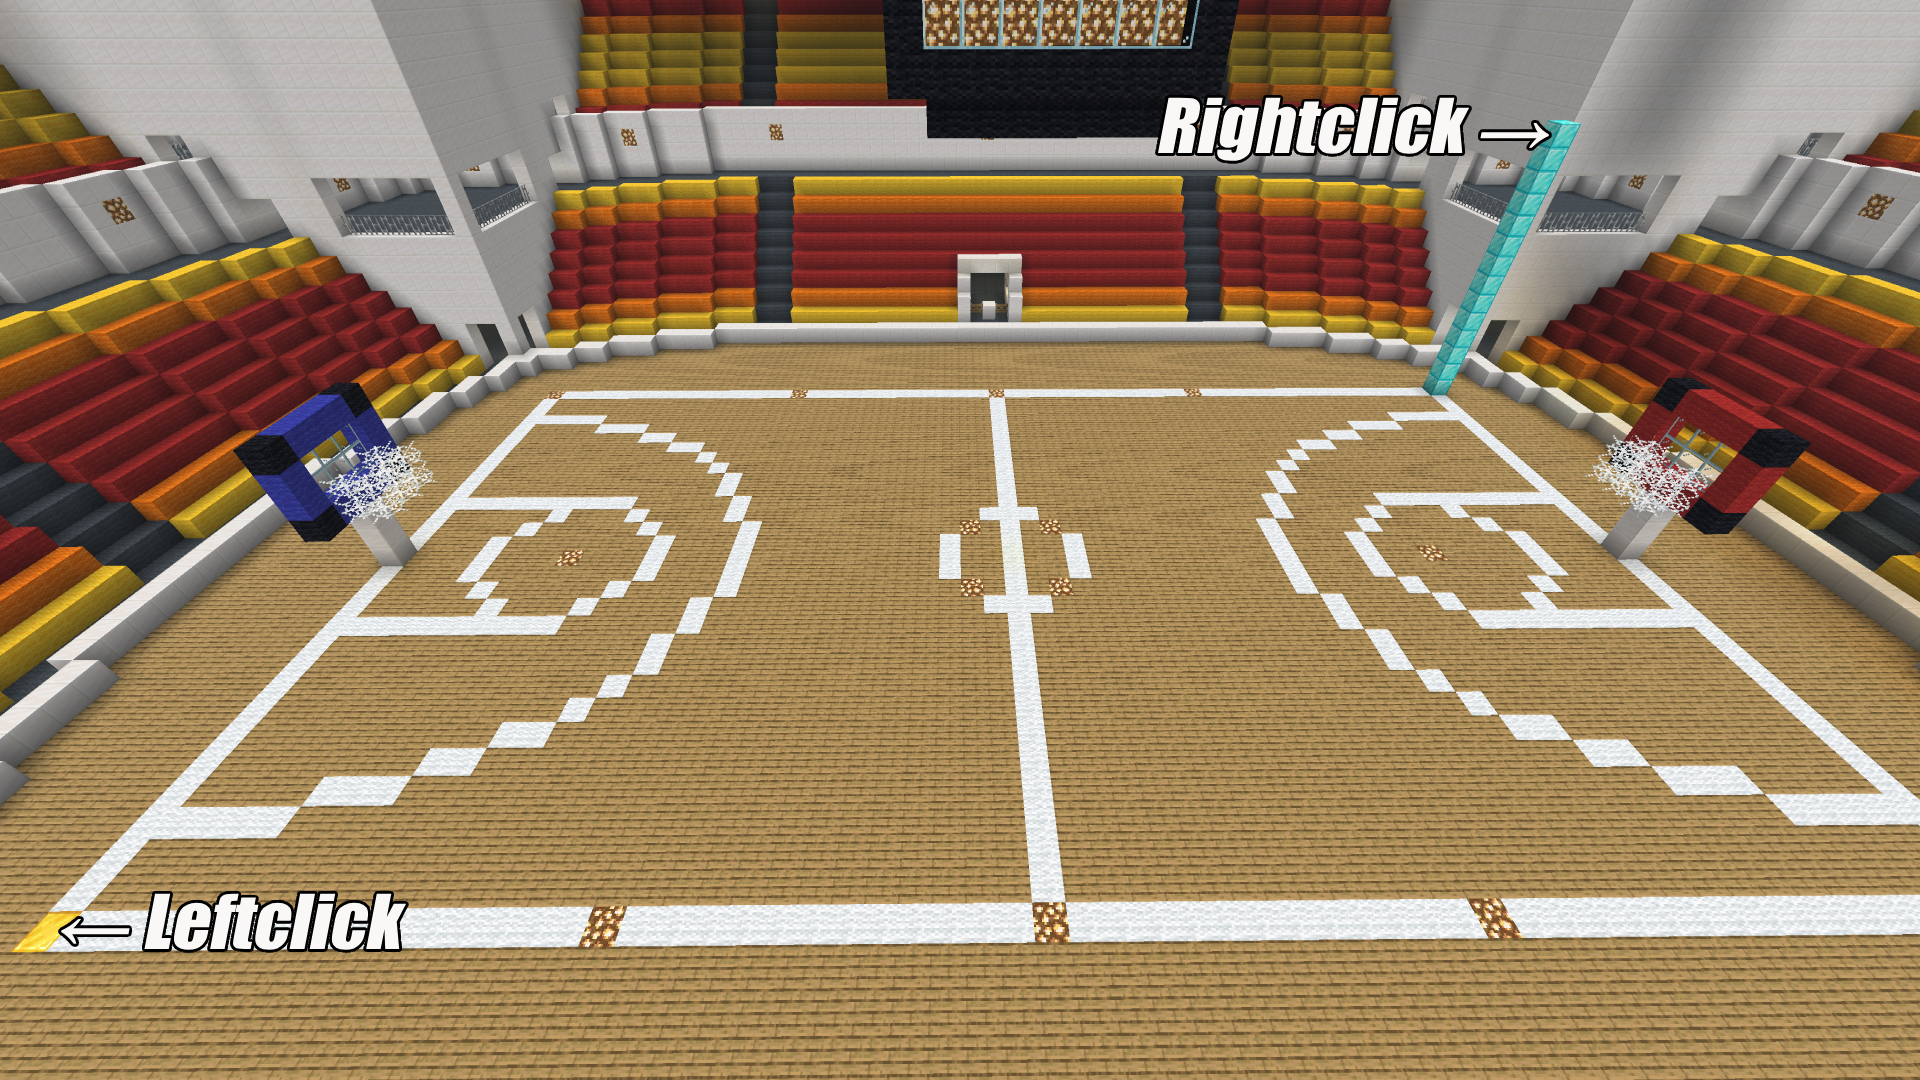
- Select Corner A: Left-click with the axe
- Select Corner B: Right-click with the axe
- Apply Selection: Run the command
/mcbasketball select game1 field
Important
Make sure your field is large enough for players to move around comfortably!
Step 5: Set Team Goals
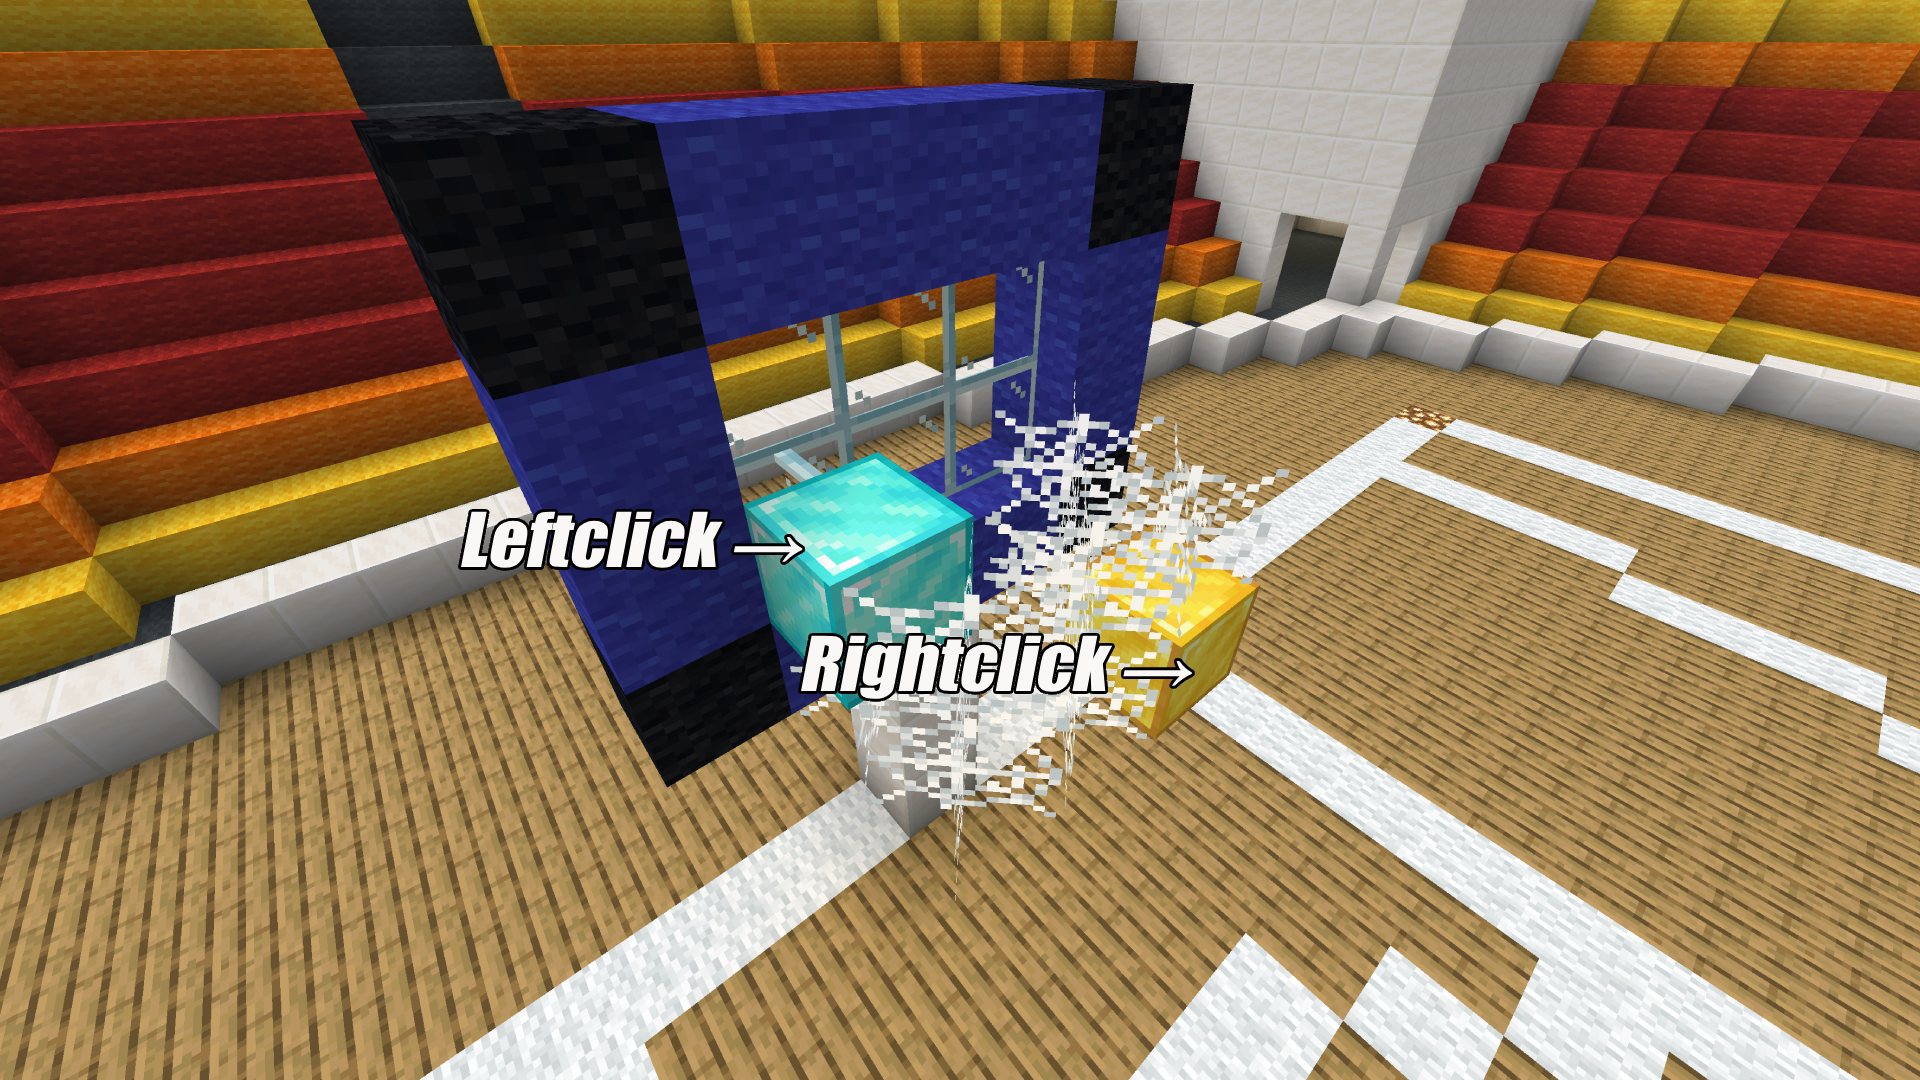
Each team needs a goal area where points are scored.
Red Team Goal
- Select the goal area with your axe (left-click + right-click)
- Apply the selection:
/mcbasketball select game1 red_goal
Blue Team Goal
- Select the opposite goal area
- Apply the selection:
/mcbasketball select game1 blue_goal
Step 6: Set Ball Spawn Point
Position yourself where you want the ball to appear when the game starts:
/mcbasketball location game1 ball
Best Practice
Place the ball spawn at the center of your field for fair play.
🎮 Activate Your Game
Step 7: Enable the Arena
Once all areas are defined, activate your game:
/mcbasketball toggle game1
Step 8: Verify Success
Confirm your arena is now active:
/mcbasketball list
Expected Output:
game1 [My first game] [enabled]
🎉 Congratulations! Your basic arena is ready!
Step 9: Test Your Arena
Players can now join in two ways:
- Walk into the field: Automatic join
- Use command:
/mcbasketball join game1
Step 10: Ball Gameplay
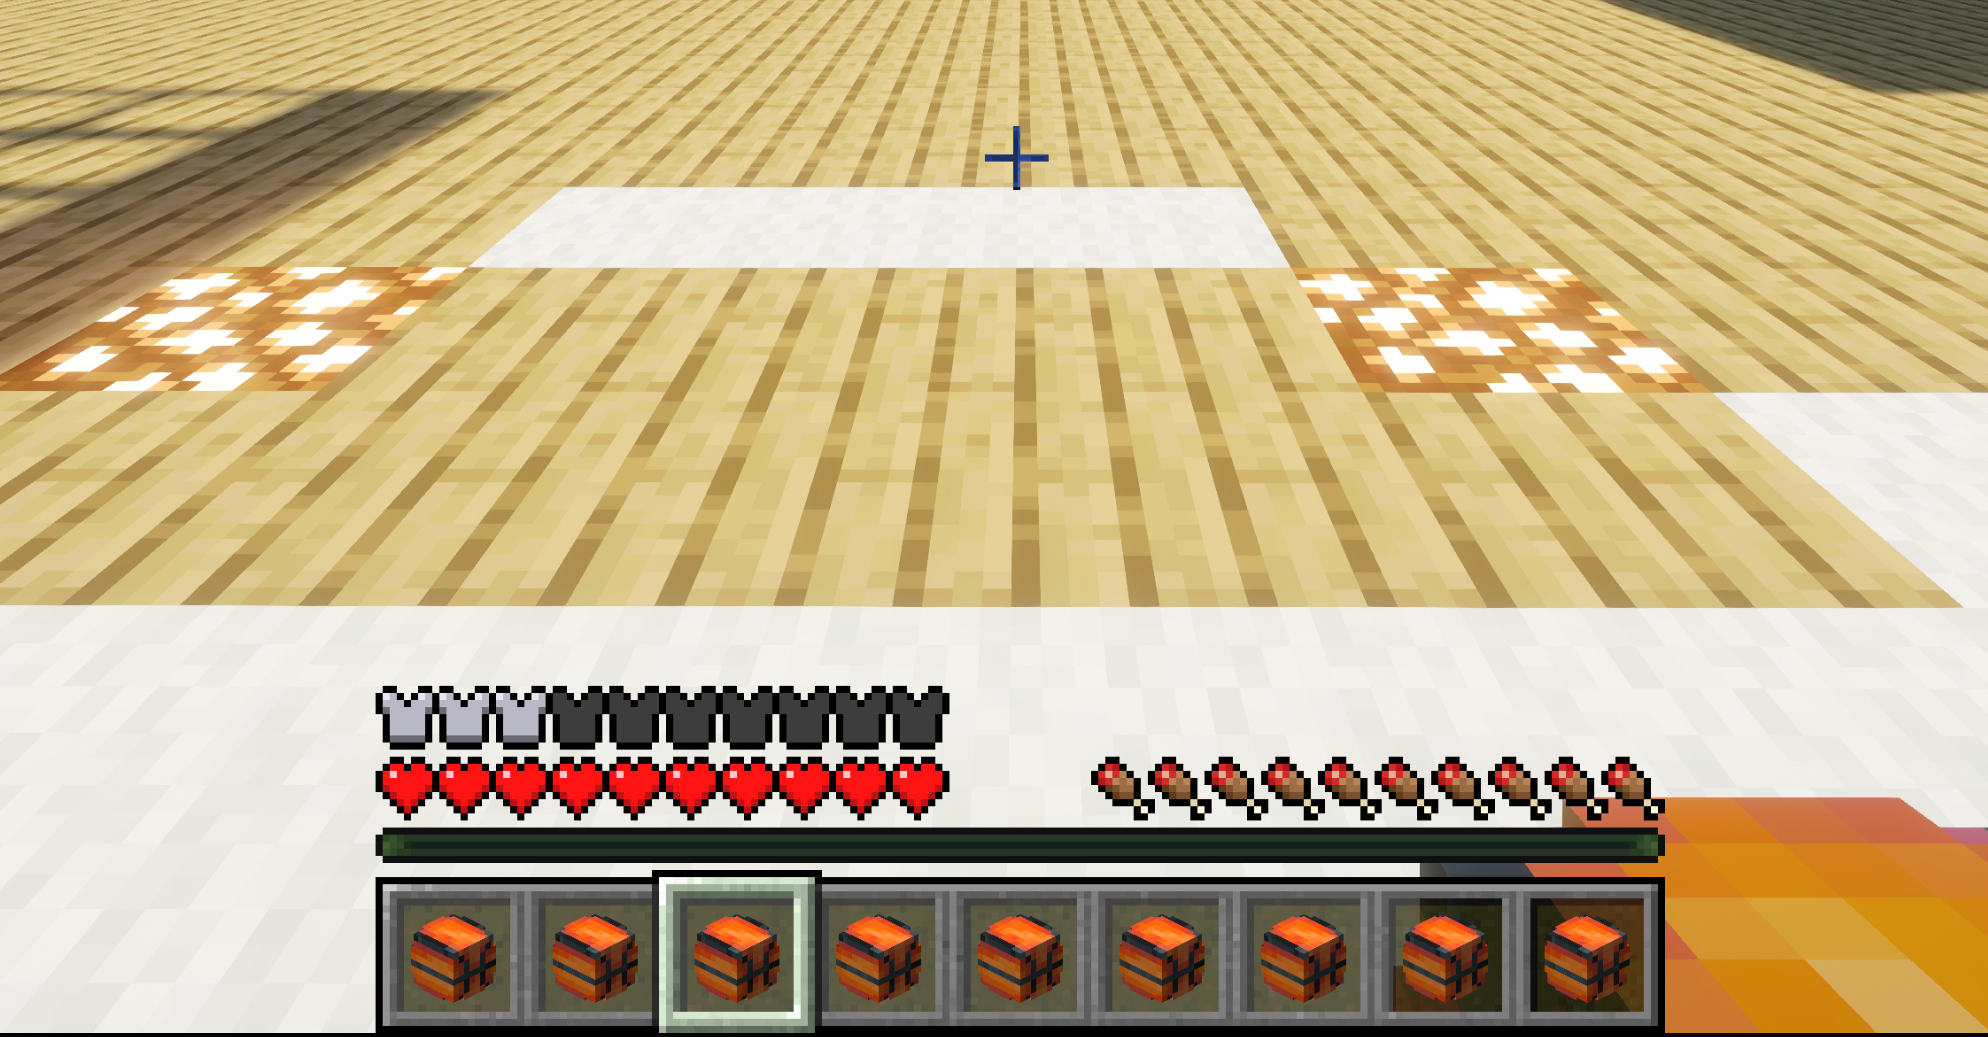
After grabbing the ball with a left-click, left-click again to shoot it. Selecting hotbar slots 1–3 produces a short shot, slots 4–6 a medium shot, and slots 7–9 a wide shot
🔧 Enhanced Setup (Optional)
Improve Player Experience
Set Leave Spawn Point
Prevent players from being teleported to random locations:
/mcbasketball location game1 leave_spawnpoint
Configure Team Spawn Points
Give teams dedicated starting positions:
/mcbasketball toggle game1
/mcbasketball location game1 red_spawnpoint
/mcbasketball location game1 blue_spawnpoint
/mcbasketball toggle game1
🏆 Create a Minigame Mode
Transform your arena into a structured minigame with lobbies and time limits.
Step 10: Convert to Minigame
/mcbasketball gamerule gameType game1 minigame
Error Messages
If you see errors, don't worry! We'll fix them in the next steps.
Step 11: Set Lobby Spawn Points
Players need somewhere to wait before games start:
/mcbasketball location game1 red_lobby
/mcbasketball location game1 blue_lobby
Step 12: Final Activation
Enable your completed minigame:
/mcbasketball toggle game1
🎖️ Advanced Features
Throw-Ins, Goal Kicks & Corner Kicks
When the ball leaves the playing field, MCBasketball can automatically trigger a throw-in, corner kick, or goal kick instead of simply bouncing the ball back. Three setup steps are required to enable this.
Step 1: Set the Outer Field, Red Out and Blue Out areas
The outer field defines the extended area players are allowed to move into when performing a throw-in, corner kick, or goal kick. It must be larger than the standard playing field so that players can reach the sideline and corner positions.
- Select Corner A: Left-click with the axe
- Select Corner B: Right-click with the axe
- Apply Selection: Run the command
/mcbasketball select game1 outer_field
The red out and blue out areas define the zones where the ball must exit to trigger a corner kick or goal kick for each team. These should be set to cover the area behind each goal line and include the outer field.
/mcbasketball select game1 red_out
/mcbasketball select game1 blue_out

Sizing Recommendation
Extend the outer field by at least 3–5 blocks beyond each sideline and goal line so players have enough room to take their positions.
Step 2: Set Keeper Spawn Points
The keeper spawn point of each team is used as the goal kick position — the location the designated player is teleported to when their team is awarded a goal kick.
Stand at the desired point front of each goal (it has to be in FRONT OF the goal), then run:
/mcbasketball location game1 red_keeper
/mcbasketball location game1 blue_keeper
Step 3: Enable Throw-Ins in the Arena Configuration
By default the ball bounces back when it goes out of bounds. Open your arena file at
plugins/MCBasketball/arena/game1.yml and set forceField to false under ballOutOfBounds:
ballOutOfBounds:
  # If set to true, the ball simply bounces back when it goes out of bounds.
  # If set to false, a throw-in, corner kick or goal kick is triggered instead.
  forceField: false
  # Seconds until the selected player is teleported to the throw-in / corner kick / goal kick position.
  timeToTeleportSec: 3
  # Seconds the player has to prepare before they gain exclusive control of the ball.
  timeToStartSec: 5
  # Seconds of exclusive ball control before other players can interact.
  timeOutStartSec: 5
Save the file and reload the arena:
/mcbasketball reload game1
How It Works
Once all three steps are complete, the following rules apply automatically whenever the ball leaves the playing field:
| Situation | Result |
|---|---|
| Ball exits over a sideline | Throw-in — nearest opponent of the last touching player performs it from the boundary |
| Ball exits over a goal line, last touched by the defending team | Corner kick — nearest attacker is teleported to the nearest corner of the field |
| Ball exits over a goal line, last touched by the attacking team | Goal kick — nearest defender is teleported to the keeper spawn point |
A temporary force field is placed around the throw-in / corner kick / goal kick position to prevent other players from interfering until the designated player has taken their kick.
Time Periods & Overtime
Configure half-times, breaks, and overtime rules by editing your game1.yml file in /plugins/MCBasketball/arena/. See the Customization Guide for details.
Referee Mode (Patreon Feature)
Set up real basketball games with full referee control. See our Referee Guide for complete setup instructions.
🆘 Troubleshooting
| Problem | Solution |
|---|---|
| Game won't enable | Ensure all required areas are set (field, goals, ball spawn) |
| Players can't join | Check that game is enabled and players have mcbasketball.command mcbasketball.join.* permission |
| Ball doesn't appear | Verify ball spawn point is set within the playing field |
| Areas not visible | Use /mcbasketball highlight game1 to see boundaries |
✅ Next Steps
- Learn Commands - Master all MCBasketball commands
- Customize Settings - Advanced configuration options
- Set Permissions - Control player access
- Add Signs - Create join/leave signs for easy access